Guides
How to Start Windows 10 Safe Mode: A Comprehensive Guide
🚀Discover how to start Windows 10 Safe Mode with this detailed guide. Solve system issues, secure your PC, and boost performance today!🔧🔒

Ever come across a situation in which your Windows 10 computer refuses to get up? Maybe it’s running more slowly than usual, crashing without warning, or throwing an error that won’t leave.
These moments can be frustrating, but they are also when Windows 10 Safe Mode is your best friend.
Windows 10 Safe Mode is your system’s diagnostic superhero, reducing it to its basic features to help you troubleshoot problems without distractions.
In this post, we’ll go over what Safe Mode is, why it’s vital, and how to start your Windows 10 computer Safe Mode using several techniques.
Let’s plunge in!
What is Safe Mode in Windows 10?
Think of Windows 10 Safe Mode as a troubleshooting playground for your computer. When you start your system in Safe Mode, Windows loads just the most essential drivers and services required to function.
This simple arrangement aids in isolating potential issues, such as defective software, a driver conflict, or even malware wreaking havoc.
To put it simply, Windows 10 Safe Mode is equivalent to starting your automobile in maintenance mode—just enough to detect the problem but without any other bells and whistles that can interfere.
With only the core functionalities running, it’s easier to figure out what’s causing your computer to act up and find a solution.
Types of Safe Mode
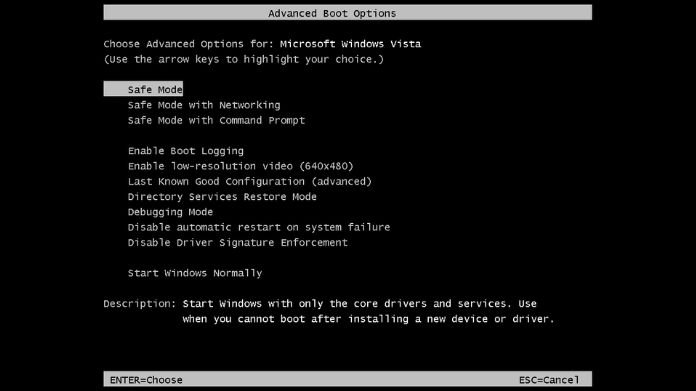
- Safe Mode: Loads the bare minimum of drivers and services.
- Safe Mode with Networking: Includes network drivers and services, allowing internet access.
- Safe Mode with Command Prompt: Boots directly to a command prompt interface, useful for advanced troubleshooting.
Why Use Safe Mode in Windows 10?
Windows 10 Safe Mode is a lifesaver for troubleshooting. Here’s why:
- Malware Removal: If your system is infected with stubborn malware, Safe Mode can block it from running, giving you a chance to remove it safely.
- Fixing Driver Issues: Your system may occasionally crash due to an outdated or malfunctioning driver. You can update or deactivate the troublesome driver in Safe Mode.
- Resolving Startup Problems: If Windows crashes every time you log in, Safe Mode provides a stable environment to fix the issue.
- Uninstalling Problematic Apps: If a newly installed program is producing issues, Safe Mode lets you uninstall it without intervention.
Imagine this: Your system keeps crashing every time you open a certain app. By entering Safe Mode, you can disable or remove the app and bring your system back to normal.
Safe Mode is a vital tool for all Windows users, regardless of whether they are resolving hardware or software difficulties.
Methods to Start Windows 10 Safe Mode
There are multiple ways to access Safe Mode, depending on your situation. Here’s a breakdown of the most common methods:
1. From Settings

This method is straightforward and works if you can access your desktop.
- Click the Start button and go to Settings.
- Navigate to Update & Security and select Recovery.
- Under Advanced Startup, click Restart Now.
- After your PC restarts, select Troubleshoot > Advanced Options > Startup Settings.
- Click Restart, and when the options appear, press 4 or F4 to enter Safe Mode.
This is a user-friendly method that walks you through the steps without much hassle.
2. Using the Sign-In Screen

If you can’t fully log in but can access the sign-in screen, this method is for you.
- Hold the Shift key, click the Power icon, and select Restart.
- Your system will reboot into the Advanced Startup Options menu.
- Choose Troubleshoot > Advanced Options > Startup Settings and click Restart.
- Press 4 or F4 to boot into Safe Mode.
This quick method is handy when you can’t access your desktop but still have control over the login screen.
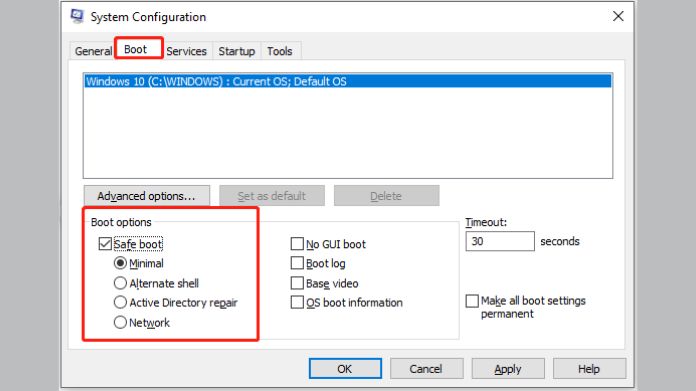
3. Through MSConfig

The System Configuration tool (MSConfig) is another reliable way to boot into Safe Mode.
- Press Windows + R to open the Run dialog box.
- Type msconfig and hit Enter.
- Go to the Boot tab and check the box for Safe Boot.
- Click OK and restart your system.
Your computer will automatically boot into Safe Mode after restarting.
4. From a Black or Blank Screen

If your screen is black or blank, follow these steps:
- Press the power button to restart your PC three times. This will trigger the Recovery Environment.
- Once in the Recovery Environment, go to Troubleshoot > Advanced Options > Startup Settings.
- Restart and select 4 or F4 to boot into Safe Mode.
This method works well when your system won’t load the desktop or sign-in screen.
5. Using the F8 Key

The F8 key was a classic way to boot into Safe Mode, but it’s disabled by default in Windows 10. Here’s how to re-enable it:
- Open the Command Prompt as Administrator.
- Type bcdedit /set {default} bootmenupolicy legacy and press Enter.
- Restart your PC and press F8 during startup.
- Once enabled, you can use the F8 key to access Safe Mode, just like in older Windows versions.
How to Return to Normal Mode from Safe Mode?
Exiting Safe Mode is simple:
- Restart your computer as usual, and it should boot into Normal Mode.
- If it doesn’t, open MSConfig, uncheck the Safe Boot option under the Boot tab, and restart your system.
Always ensure you’ve resolved the issue before exiting Safe Mode to avoid recurring problems.
Our Thoughts
Safe Mode is an awesome feature that every Windows 10 user must understand. If you are dealing with a virus, driver trouble, or system failure, it’s the place to go to fix and sort things out.
You can reach it in many different ways so that you are in a position to face any challenge that pops up. Have you ever used Safe Mode? If so, we’ll be happy to know your feedback and experience in the comments section below!


Dolly Jelly
January 29, 2025 at 7:18 am
Great guide! Your step-by-step instructions for entering Safe Mode in Windows 10 are clear and easy to follow. This is super helpful for troubleshooting various system issues. Thanks for sharing such a valuable resource!